I am in the midst of cleaning and sorting through all of my craft stuff. A large portion of it has already been donated. The one thing that I cannot wrap my mind around is how much fabric I have accumulated over the years. Finding storage for it has become a real problem. I hope to live long enough to use it all and I certainly will give it my best try. For now and possibly forever, I am on a self imposed fabric buying diet.
All kinds of foolishness has been going on in my life but I won't bore you with the details. My family is intact and functioning well just in case you were wondering. In between it all, I have been working hard on getting my entire house in order, digging through decades of stuff, brutally tossing, organizing, and just trying to create a well functioning home once again.
The following is the original project that I put together for the I Am Roses contest back in May of this year. After much thought, I decided not to enter the desktop picture holder because of it's simplicity and entered my ring box instead. These pictures have been sitting in my computer since that time. Because I haven't been crafting at all over the last four months, I thought that I'd share them with you today.

For this project, you will need several mulberry paper leaves and roses, A Versamark Watermark Inkpad, glittered embossing powder and heat gun, gold 28 gauge wire, assorted small beads, a 1/4-inch paper punch, acrylic paint and paint brush, gold foiling paint or gold acrylic paint, a small flower pot, a small weight to weigh down the flower pot, small piece of styrofoam, cardboard, and cardstock, and a hot glue gun.
To begin, dip random parts of the mulberry leaves into a Versamark Watermark Inkpad.

Dip the leaves into the embossing powder.

Dip the tips of the rose petals into the ink pad.

Dip the roses into embossing powder. Use your heat gun to heat emboss.

I used a gold foiling pen to color the flower stems as they were originally green in color.

Using a length of wire anywhere between 2-1/2 to 4 inches, poke one end into the base of the flower alongside the existing stem.

Twist both wires together. The additional wire will lend more support to the rose stem.

To make the picture hanger, take a piece of wire about 5-1/2-inches and bend the upper third into a 90 degree angle.

Curl the short end of the wire into a swirl.

The wires used in this project measured anywhere from 5 to 8 inches. Add a bead to the center of a piece of wire.

Twist the wire tightly to secure the bead.

Create a flower and leaf cluster by twisting a couple of leaves around each of the roses.

Cut a piece of styrofoam that will fit snugly inside the pot. Cut a round piece of cardboard that will fit on top of the styrofoam (to hide the ugly styrofoam). Choose a weight of some kind to give some heaviness to the pot to keep it from tipping over(small rocks are good). You can use whatever small, weighty item you have laying around the house.

Paint the outside and a small portion of the inside of the pot with acrylic paint.
Glue the weight to the bottom of the pot using a hot glue gun.

Decorate the outside of the flower pot. I've chosen to keep it simple with just woven ribbon glued to the outside rim.

Cut a circle from cardstock using the cardboard circle as a template. Glue the cardstock to one side of the cardboard circle. Punch a hole in the center using a paper punch. Glue the cardboard side of the circle onto the styrofoam.

Gather all of the stems together, taking care to stagger the height of the flowers and beads while at the same time, arranging it in a pleasing manner. Glue the stems into the hole.

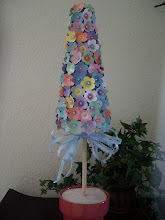
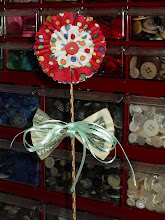
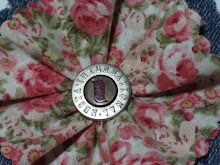
Here is a closeup of the flowers. They remind me of porcelain flowers. Well, sort of.

Here is the completed project.

The ring box and the desk top picture holder complement each other nicely.

I hope that you enjoyed this project. Until we meet again, take care, my friends!
Aloha,


33 comments:
A very cute project. Thank you.
So pleased you're back. have been concerned. Continue to take care.
It's good to have you back!
Gorgeous project!
Aloha Sistah,
I really want to try this, it turned out beautiful and I love Pink Roses :) I live in Hawaii too on Oahu. I am always looking for ideas, How can I get in touch with you if I have any questions? My email is joyfulsister60@msn.com
Blessing & Mahalo Lorie
You have been missed in blogland. Thanks for the wonderful creation. I so love your ideas and tutorials. I hope things go well for you and that you won't need to be gone too long.
So nice to see you blogging again.
Thanks for sharing a new project, it's beautiful!
So good to see you on here. I can totally understand about not blogging. I seem to go for months at a time without blogging, although I do keep up with other's blogs. The picture holder is absolutely lovely!
I, too, need to clean out my house and get rid of a lot of craft stuff that I don't seem to use anymore. It is just so hard. I will go through things and think to myself "I just might want to use that some day". My husband says I am becoming a hoarder! hahaha At least I am neat and organized with it!
Take care and hope to hear from you again soon!
Blessings,
Diane
It's great to hear from you again and to know that all is well. Sounds like you are very busy. Your picture holder is GORGEOUS!! Thanks for the ideas.
it's soooo cute!!!
you are amazing!!
I was so happy to see a post from you!! I've missed seeing your projects! This is beautiful! Thanks! Take care and hang in there!
I am so glad to see you here. I had often wondered if you are OK and well> I havent posted much here lately either--but wanted to let you know I am following you still.... see you if and when you are back
Wondering what happened to you. Glad everything is OK. Love your tutorials and all the things you create.
Take Care,
Lois
Just a quick note to let you know that a link to this post will be placed on CraftCrave today [06 Oct 09:00pm GMT]. Thanks, Maria
Good to hear You're alive:)! I love Your projects. All the best to You.
Bentornata Lettie!!!!
Un bacione...
Emy
It's so good to hear from you. I was worried something horrible had happened...so glad that all is well. Are you giving up crafting? That would be sad because you are so talented. At any rate, it's wonderful to hear from you. Have a great fall.
This is such a sweet little project, I love it =)
Hi Lettie, it´s great to have you and your great ideas back.
I hope everything is fine.
Have a great Halloween and a funtastic night
Janine
I couldn't find an email addy - but I wanted to let you know that I posted one of your tutorials on my blog... as inspiration for a rag rug I'm making.
I'd love for you to stop by The House on Lavender Hill and check it out !
gena
www.thehouseonlavenderhill.blogspot.com
Maravilhoso, quer o postal, mas mesmo lindoooooo o vaso das rosas.
beijinhos
I found your blog and I liked it very much!! Your work its great and I decided to follow you!! Best regards from Greece!!
Great ideas, congrats!!
My favorite : coasters out of old denims!
Hello, I've just included a link to you on one of my blog posts, I do hope that's ok? It's for your fantastic tissue holder pattern, love it so much and have made it over and over again... Do hope all is well with you. Fran x
hola Arlette , deseo que estes bien , me encanta tu blog , te felicito haces cosas bellisimas , besos
Very very nice blog!! I like the way you do step by step! I hope you don't mind but I am following your blog and was wondering if you would follow my blog??
Thanks
Linda
Hi, What a wonderfull things. I m very glad to fınd you. I had been 2 times in hawaii for a holiday.I m from Turkey. My blog is http://pandoraarte.blogspot.com See you.
MERRY CHRISTMANS AND
A HAPPY NEW YEAR !!!
Love the tutorial! Hope you had a nice Christmas. Hope to see more of your crafting. LOVE IT! I love love love Hawaii. I lived there 20 years ago and visited in November. Can't wait to go back.
Hola precioso tu arreglo floral divinas las rosas quiero contarte que recorrí tu blog y me encanto la variedad y la alegría de tus trabajos besos Sandra.
Hope all is well with you and yours x
Hi Lettie, I'm Denise and just found your site. I love your tutes and have used a couple. I'm kind of ADD and use Pinterest to help keep track of ideas. I even have a board called Tips and Techniques just for how-tos that apply to different projects. Your pinback cover is one of those, and I'd like to be able to pin your projects to my boards. Would that be OK?
Love the site! I have a question for you and can't seem to find a contact button...is there an email address I can reach you at?
Hermosos espacio, gracias por compartir tantos proyectos tan bellos, desde hoy te sigo
Desde SALTA, ARGENTINA un abrazo GRACIELA
Post a Comment