Wednesday, November 25, 2009

Snowflakes in my Holly

**This tutorial is intended for personal use only.**

It is exciting to add a new ornament or two to the tree each year. This is a quick and easy project that can be whipped up in no time flat and is sure to leave you with oodles of spare time to bake up those cookies and wrap up those presents.

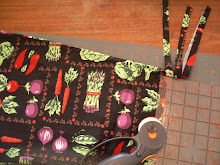
This project requires small pieces of green and red fabric, white felt, Heat 'n Bond Ultra, cardboard, 2 white buttons, 8" piece of gold thread, pencil for tracing, hot glue, sewing needle and red thread, an iron and pressing surface, and scissors.

To create the large leaf pattern, start with a piece of paper that is 2 inches in length by 7/8 inches in width. Divide into three parts as shown in the diagram. Draw a holly leaf shape within the space as shown. Both sides of the leaf should be a mirror image of the other.
To create the small leaf pattern, start with a piece of paper that is 1-1/2 inches in length by 5/8 inches in width. Divide into three parts as shown in the diagram. Draw a holly leaf shape within the space as shown. Both sides of the leaf should be a mirror image of the other.
Cut the shapes from the paper and transfer the shapes to carboard. This will become your leaf patterns.


Along with the holly leaves, you will need a 3" circle and two 1-3/8" circles with a small hole in the center.


Trace 8 large and 8 small holly leaf shapes onto the non-glue side of a sheet of Heat 'n Bond Ultra. Iron the Heat 'n Bond onto the wrong side of a piece of green fabric. Cut out all 16 leaf shapes.


Remove the paper backing and iron 4 large and 4 small holly leaf shapes onto white felt. Be sure to leave a minimum of 3/8" between the shapes.


Cut around each leaf shape leaving a scant 1/8" margin of felt around the edges.


Turn holly leaves over with the plain side of the felt facing up. Fuse the remaining fabric leaf shapes to the felt. Bonding both sides adds stability to the holly leaves and also adds a finish to both sides.


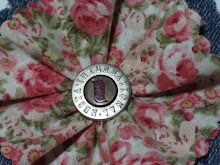
To make the holly berries, use the 3" circle template to cut two fabric circles from red fabric.


With needle and thread, take a 1/4" running stitch around the perimeter of the fabric circle, folding in the raw edges approx. 1/8" as you sew.


Place cardboard in the center.


Gather and knot securely.


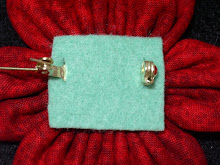
Sew a white button to the center of the holly berry. The hole in the cardboard is there to make sewing on the button easier. Repeat this process with the second fabric round.


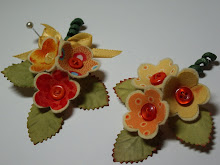
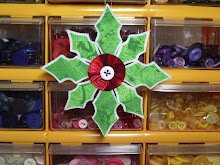
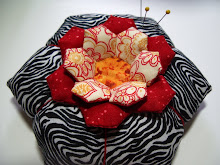
Glue the eight holly leaves to the wrong side of the first holly berry, alternating large and small leaves as you go around. Glue the second berry on top to hide the mechanics.


Sew an 8" piece of gold thread into the felt portion of one of the large holly leaves, approx. 3/8" from the top.


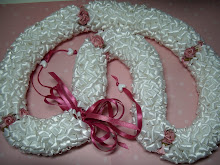
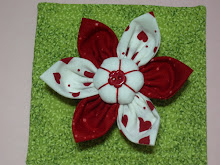
A quick and easy Holly Leaf Snowflake to brighten up your tree. Imagine a white Christmas tree with nothing but these snowflakes, shiny red bulbs, and twinkling white lights. Not exactly traditional, but it works for me.


Enjoy!

Aloha!

Monday, November 23, 2009

Kindness and the Blogging World

Travelling to a location that you are unfamiliar with is exciting. Just think of the fun you will have exploring new and exciting places. Travelling to a location that you are unfamiliar with for major surgery is darn right scary and stressful. It can leave you feeling lonely and vulnerable at a time in your life that you need the most support.

A few days into our trip to North Carolina, I received an invitation on my blog from two lovely ladies living in the Raleigh area asking if I would like to get together for lunch. What an exciting and thoughtful gesture it was and of course we did!

Not wanting to venture too far from hubby, Kristen of Dragondreamer's Lair and I had lunch at Denny's near my hotel. In my usual fashion, I forgot my camera so I do not have a picture of the two of us. It was wonderful meeting her in person. We chatted about all kinds of things and it was loads of fun. She's very sweet and easy to talk to. Thank you, Kristen, for a fun lunch and a much needed break from the craziness of the moment.
Kristin brought me some beautiful yarns and some yummy chocolate chip cookies. Of course, the cookies are not pictured because we ate those up in a snap.


Meeting Thearica of Pigtales and Quilts was almost not to be due to the terrible stormy weather that came through Raleigh. She persevered and we were able to do lunch the day before I left for Honolulu. Karen, a fellow board member of Thearica's on the HGTV quilting board, came in from Virginia that day and joined us for lunch at the Olive Garden. We do not have an Olive Garden in Hawaii so it was a real treat for me. The stuffed chicken was divine. Both gals were so sweet and I felt so welcomed and right at home.

Here we are, Karen, me, and Thearica on a bench fronting the Olive Garden.


We wanted a picture in front of their sign so Thearica and I had to romp through the Olive Garden's garden to get this shot.


Thearica and Karen are quilters and they offered to take me fabric shopping. Of course, there was no way that I was going to say no because you all know how much I love fabric. Our first stop was at Wish Upon a Quilt! What a wonderful shop filled to the brim with everything a quilter could desire.

These are some of the things that I came home with. Best Press, a layer cake, charm pack, Bias Tape Makers, and a quilting book.


Of course, fabric.


more fabric....


and more fabric.


We headed to JoAnn Fabrics where I purchased, you guessed it, more fabric. We don't have JoAnn's in Hawaii, so this was a real treat.


Beautiful red fabric that reminded me of our Hawaiian prints.


Thearica's hubby, Butch, is a woodworker. I was very touched when she presented me with a momento of our trip to Raleigh. A beautiful pen made by Butch. The wood used in this pen is from wood that was being replaced in his mother's house. The wood is very old and from the 1700's. I am very appreciative of anything with age and I can only imagine if this piece of wood could talk, it would probably have some really beautiful and touching family stories to tell.


Although our trip to Raleigh was for surgery, I did have some really good times spent with some very nice people. Thank you, Kristin, Thearica, and Karen for making me feel so at home and for showing me a very good time. A time that I shall never forget.

A huge thank you also goes out to Stephanie of Scraps for lending me support through email even though she herself was going through a lot with her own hubby's health. She's also from North Carolina, but too many hundreds of miles separated us from meeting each other in person.

To Becky G. for offering to put me in touch with her very dear friend in Raleigh. Thank you. This meant more to me than you will ever know.

And to all of you who offered support in prayer and well wishes, thank you. Each night before I put my head on my pillow, I would read your comments. I was far from home but I never once felt all alone. Thank you for making us feel so blessed.

I would also like to thank you for your get well wishes. I am finally feeling better and am no longer bed ridden. I took my seasonal flu vaccine, so by process of elimination and comparing the symptoms, I believe that I had the H1N1 virus. I checked with my doctor before I left for North Carolina to see if I could get vaccinated for H1N1 but they weren't available. Her advice was to check with Wake Medical in North Carolina to see if they were holding shot clinics. I was told by the nurses there that they were experiencing a shortage and had barely enough vaccine to go around for their own staff.

My advice, if you are one that was thinking of exposing your children to H1N1 to build their immunity instead of getting them vaccinated, I am here to tell you not to do it. This is a terrible strain of the flu and made me so miserable that I actually wished for death. It's that bad. I would have chosen to be vaccinated over having the flu any day. And I speak from experience.

Have a Blessed Thanksgiving, everyone. I have lot's to be thankful for this year. And now that I'm feeling much better, lot's of turkey to eat too!

Aloha!

Friday, November 20, 2009

Sick!

We're home now and hubby is doing well. Thank you for your prayers. It was comforting to know that we had the force behind us as we tackled yet another life circumstance.
Leaving Raleigh was a blur. We received a call from the airlines at 6:00am notifying us that our 10:30am flight had been cancelled. That meant that we were forced to make a mad dash to the airport to catch an 8:45am flight instead. To make matters worse, there was thick fog that blanketed most of Raleigh which made driving rather scary. We arrived at the ticket counter, only to find out that our seating was now a mess, and that on our last leg of the trip, hubby would be sitting in row 10 and me in row 40. The guy to my right was constantly blowing his nose, and the guy to my left looked ill, covered himself in a blanket as if he had the chills, and had a constant hacking cough. For 7 hours, he coughed. I couldn't change my seat as the flight was completely booked.
To make a long story short, two days later, I got sick with the flu. H1N1??? A good possibility. The symptoms point that way. The first and second day was so terrible that it left me wishing for death. Today, the third day into this, I'm feeling much better and glad that the big guy didn't grant my wish. What a difference a day makes.
And, to keep this post from becoming more than a bunch of whining, I thought I'd show you a cute handcrafted item that I fell in love with. This little angel is made from a real cotton boll. Isn't she sweet? I purchased her at the Natural History Museum in Raleigh.


I wanted you all to know that I'm still here and haven't abandoned my blog. I'll be back as soon as I feel better. For now, I'm heading back to bed. Cough, cough, sniff, sniff.
See you soon!

Wednesday, November 11, 2009

Tutorial--Magnetic Tic-Tac-Toe

**This tutorial is intended for personal use only.**

Disposable plastic bottle caps. How many times have you thrown them away and felt guilty about doing so? Here is a fun way to recycle a handful of them.

For this project, you will need felt, 4 contrasting fabrics, 10 plastic water bottle caps, 19 craft magnets, disappearing marking pen, cardboard, tacky glue, fabric glue (optional), Heat n' Bond Ultra, embroidery thread, iron and pressing surface, ruler, sewing needle, and scissors.

To create the game board:
Cut three 7" squares from felt. Using a disappearing marking pen, draw a grid consisting of nine 2-inch squares in the center of the first felt square. Mark the middle of each square by placing a small dot in the center.


Place a magnet in the center of one of the squares in the grid using the dot as your guide. With disappearing marking pen, trace around the magnet. With scissors, cut out and remove the circle from the felt square. Repeat with the other 8 squares. Discard the circles or save them for future project use.

Place the first felt square on top of the second felt square. Using the first piece as a pattern, trace the 9 circles onto the second piece of felt. Cut out each of the nine circles. Again, discard the circles or save for future use.

Leave the 3rd felt sheet as is.


The next step may be a bit messy so I recommend that you work on a sheet of waxed or parchment paper. Spread fabric or tacky glue onto one side of the first sheet of felt. Glue this onto the second sheet of felt, taking care to line up the holes evenly.
Glue the piece with the holes onto the third sheet of felt.


Add a fair amount of tacky glue into each of the 9 holes. Place a magnet into each hole. Place a sheet of waxed or parchment paper on top and weight with something heavy (a book works well) until it is dry.


To create the playing pieces:
Using something round and small like a thread bobbin or a coin, trace circles onto cardboard and cut each one out.

**The goal will be to stack as many cardboard circles as needed to boost the magnet flush to the top of each of the bottle caps. I used the cardboard from a box of Frosted Flakes Cereal. This cardboard is very thin and it took 12 circles per (Dasani brand) bottle cap to raise the magnet flush with the top. Using thicker cardboard will help to speed up this process. It is better to have the magnet protruding a smidgen above the bottle cap than below it. This will allow for better magnetic contact between the playing pieces and the game board.**


Glue each of the circles together using tacky glue.


Glue the magnet onto the top of the cardboard stack.


Glue the cardboard/magnet stack into the bottle cap with the magnet side facing up. Set aside. Let dry completely. Repeat these steps for the remaining 9 bottle caps.


Completing the game pieces:
Cut ten 3-3/4" circles from fabric, 5 of each print. (If you are using bottle caps other than Dasani brand, you will need to measure your bottle caps to determine what size fabric rounds to use.) With needle and thread, take a 1/4" running stitch around the perimeter of the fabric circle, folding in the raw edges 1/4" as you sew.


Place a bottle cap, magnet side down, onto the wrong side of the fabric circle.


Gather fabric tightly around the bottle cap, knot securely before cutting thread.


To complete the game board:
Cut nine 2-1/2" square pieces from fabric, five from one print and four from the other.


Sew into a 9-patch using 1/4" seams. Alternate fabrics to achieve a checkerboard pattern. Press seams flat.


Cut a 6-1/2-inch square piece of Heat 'n Bond Ultra and fuse it to the wrong side of the 9-patch. Remove the paper backing.


Place the felt piece onto a pressing surface with the magnet side facing up. Place the 9-patch on top of the game board, right side facing up, making sure that the magnet is centered in each of the 9 squares. (Note that there will be an extra 1/4" around the perimeter which will be trimmed away in the next step.) Fuse in place with an iron.


Using a rotary cutter and ruler, square up the piece to 6-inches square.


Finishing touches:
With 6 strands of embroidery floss, take a running stitch 1/4" in from the outside edge around the perimeter of the game board. A blanket stitch may be used instead. If you are a quilter, you may wish to add a bound edge.


This makes a wonderful traveling game as the magnets will hold the game pieces in place while the game is in session.


I hope this tutorial makes sense (I'm tired!) and you are able to make a Tic-Tac-Toe game of your own.

Everything is going as well as can be expected with James. He will be seeing the surgeon on Friday for a follow-up. We hope to receive the all-clear at that time and start our journey back home early Sunday morning. Thank you again for your thoughts and prayers. We both appreciate it very much.

Aloha!

Sunday, November 8, 2009

Fabric Therapy

Hello everyone! Thank you very much for your get well wishes and prayers. James and I appreciate it very much. He is doing as well as can be expected at this juncture and has made it out of the NICU to a regular room on the nursing floor. We are hoping that he will be well enough to fly home to Hawaii on Sunday. For those that are asking, we are in Raleigh and he had his surgery done at Wake Medical Center. It is a very nice facility staffed with many warm and caring people.

I had high hopes of sneaking in a trip to a quilt shop for some fabric therapy prior to James' surgery. Theres nothing like fondling fabric to ease anxiety. After locating several quilt shops on the internet and reading their online reviews, I knew which one I would visit if the opportunity arose. Believe it or not, I have never had the opportunity to visit a traditional quilt shop before. Most of the fabric outlets that I go to in Hawaii are in warehouses.

It was a beautiful drive to Wake Forest where Quilts Like Crazy is located. And what a lovely shop it was, filled with oodles and oodles of eye candy! I probably spent a good hour there while James waited patiently. From the moment that I walked through the door to the time that I left, both Karen and Betsy made me feel right at home. My adrenaline was running overtime because I was truly in my element, surrounded by some of my favorite things.

Due to airline baggage weight restrictions, I was careful not to overdo my purchases but I did walk away with many beautiful pieces of fabric.

I found four scrumptious fat quarter bundles that I loved.


These fabrics in muted shades of pinks, browns, and light turquoise were so pretty that I just had to have them.


A wonderful selection of Mary Engelbreit fabrics in pinks, yellows, and reds. I tried to keep my cool but inside I was squealing with delight. I love the whimsy of her fabrics.


The rich greens, browns and pinks of these fabrics are truly scrumptious.


And to top it all off, a couple of handbag patterns along with a few more Mary Engelbreit fat quarters. I just couldn't resist!


I should be here for another week as long as everything goes well. I do have pictures downloaded for a tutorial but will need to find the time to write it up. Hopefully, I'll have it ready before I leave North Carolina at the end of this week.

By the way, there is definitely something to be said about southern hospitality. To all those that we have encountered, from doctors and their staff to everyday people that we have met, thank you for your kindness and warmth. Y'all are just downright nice and have made our situation much more bearable.

Thanks again, everyone, for your prayers and support. I hope you're having a wonderful weekend.

Aloha from North Carolina!


Quilts Like Crazy
1241-08 S. Main St.
Wake Forest, N. Carolina 27587